
Due to how the Raspberry Pi is setup, it's not as simple as just plugging in a speaker as I had originally planned...

Plan A: USB Powered Speakers
So figuring out I need active (powered) speakers, my first plan was to use off the shelf USB powered computer speakers. I found some at Staples for around £5 - this is the top end of my budget really - so yes they will sound cheap!
There are many options on Ebay and Amazon - I'm sure further testing of different types of speakers would be advisable, most tell you the specs anyway, and are easy to take apart to fit your project.
The Adafruit speakers (pictured below) are supposedly picked to get the best audio from a Raspberry Pi. I've not used these and kept on the budget route anyway, sure the audio is going to sound raw as a result.


By default the maximum current all USB peripherals can draw from the USB port is 600mA - there is a way to increase it according to Hackaday. For my project, I need to check I can do this (as I also have a LCD screen). My power supply is 5v 2A, I may need to make it beefier, maybe 3A or 4A. Will hold off on this just now when I explore other options.


Plan B: Custom LM386 Audio Amplifier
Enlisting help from audio aficionado, Bob Leadbeater of BLM Audio (and my studio neighbour), we set about making a custom audio amp using the LM386 chip, with help from this instructables.

After some serious prototyping our efforts weren't successful, we're pretty sure this is due to the levels of audio the rPi spits out.
 |
| Using components like they aren't designed to. Hack it |
But of course many of the problems are me! Due to working on no budget, I'm hacking together cheap components and set on using the on board rPi USB as a power supply. This way of working is not good really, especially when working alongside a professional such as Bob (sorry Bob)!
Perhaps we're barking up the wrong tree...
 |
| Ceramic dog-shaper speakers design by Matteo Cibic. |
...but I'm adamant to get it working via the USB power. Perhaps it's a no go, but as before maybe I need to try increasing the current to the USB ports.
For now I've realised the importance of having the audio, my absolute fallback is to use headphones. Proof of concept and for demonstration I need a working version, so on to Plan C...
Plan C: Battery Option
My next option was to get something up and running quickly. I found this portable bomb speaker, from Tiger for a whopping £4, is a rechargeable keyring meant to play music from devices. You can find crap like this anywhere, I only thought right now I may have been able to get something in the pound shop.
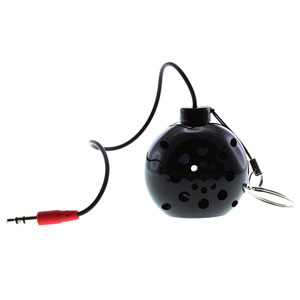
When pulled apart it was easy to fit into my project. The 3.7v lithium-ion battery seems to charge fine directly from the Raspberry Pi USB. Playing and charging at the same time worked ok when I tested it. I'd like to leave it running for longer period of time to see what happens when the battery is flat.
 |
| Add to CV: Pulling apart cheap speakers |

I also tested completely cutting out the battery, the USB still powers the speaker. With and without the battery, I'm not trusting this setup in my project, plus it's dirty and horrible - looks and sound.
I'm not overly impressed with the quality and the use of a battery in my project. It might work for you but...
It sounds like shit...
 |
| Toilet Speakers. For playing all the songs you don't like |
Plan D: Adafruit Stereo 2.8W Class D Audio Amplifier
I'm thinking I need to try an amp again, of course I can buy assembled boards online, I'd like to make sure I get the right one before I go ahead and found these Adafruit boards. Find it to buy here. There's also the 3.8W one. They have some cheap 4 Ohm 3 Watt speakers too, worth a try...

But hold on...
In the process of hacking different bits of speakers and amps along with researching online, I decided to give Plan A (USB powered speaker) another look as it is the simplest option for me. So just before altering the rPi to send more current to the USB hubs, I decided to try again. This time, with one of the speakers removed, the circuit worked fine, no stuttering and sound working as well as it can. The current draw with two speakers must have just been a bit much for the USB hub.

The amp board on this particular set of speakers has a little volume control wheel and LED to show it is powered - this is quite handy for my project actually - I'll make an access hole on the back panel to allow alterations to sound levels.
I'm only looking for one speaker in my project. If you're looking for two you may need to try increasing the current to the USB hubs, for better quality and control try out the Adafruit amp - which was my next step.
I don't have much experience working with audio on projects, it is something I tend to neglect or leave till after the visuals, this process has made me realise it should be a much more important aspect of a project, well planned out from the very beginning.
No comments:
Post a Comment