
Informal presentation to my fellow MA Multi-Disciplinary Printmaking students at UWE, Bristol.
Practitioners I am looking at and the work I am currently making.
Links, notes, ramblings below:
Notes
- Work. Art. Play.
- I've noticed these 3 key areas I'm exploring in my overall work.
- Influence: Rosemarie Fiore / “Smoke Painting #34” / 2013
- Based on this theme of Work Art And Play New York based artist Rosemarie Fiore
- Smoke Drawings. Residue from Firework smoke.
- Process: Smoke Paintings
- Using a DIY rig to contain the fireworks while painting onto paper.
- Influence: Rosemarie Fiore / “Scrambler Drawings” / 2004
- Large Spirograph drawings
- Process: Scrambler Drawings
- created using a fair ground ride called the scrambler.
- Recap - Rosemarie Fiore
- Process is more interesting. I absolutely love Fiore's processes and methods for image making
- Are the outcomes a necessity of the process?
- Always required to be displayed alongside documentation of process - such as video.
- More info: See my blog about Rosemarie Fiore
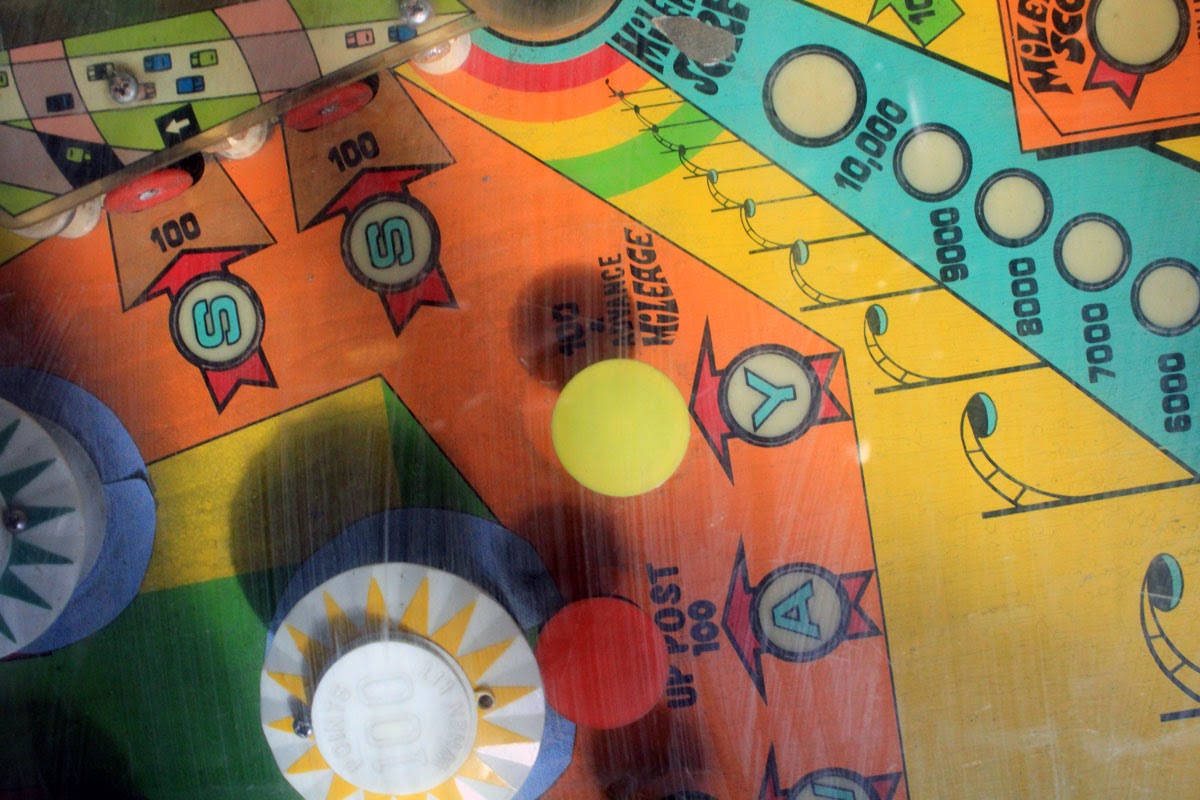
- Pinball
- I'm interested in these types of processes when creating my own work
- My project is based around the medium of Pinball.
- This is an example of a vintage Pinball Machine from 1976 (which has been modified)
- Artwork originally by Gordon Morison who created the art for over 150+ machines) during the 70s-80s
- Pinball is a combination of art , music, sound immersing players in a story. It's a piece of artwork.
- Retro - popular culture.
- My interests is as an example of printmaking - the backglass, playfield and plastic parts
- Also electronics + programming - to create interactivity between user (player/viewer) and the artwork (pinball)
- Research
- Finding machines to play - no longer arcades, so turned to the internet
- Found a community and league
- Have now played over 50 Machines. 280th in the UK & 9042nd in world Pinball Rankings.
- Understand different types + functions of Pinball machines.
- More on Resarch Play
- Work Experience with MyPinballs
- Work experience - Understand the mechanics and electronics better.
- Restore, Custom, Hacking, Add ons/Mods
- More of my Work Experience
- Pinbox
- My original aim was to build my own pinball machine. It is quite ambitious.
- Start with a smaller, toy like, game.
- Prototyping
- More on Pinbox project
- Pinbox 2
- Make multiple small scale games
- Processing - making realisations for my direction focussing outcome rather than natural
- I wrote a small part about realisations about my process on this project so far
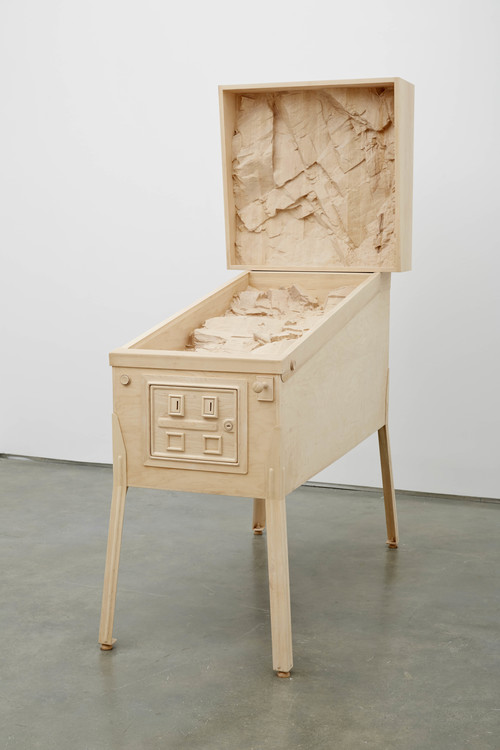
- Influence: Roxy Paine / “Intrusion” / 2014
- The moment I saw this work by Roxy Paine I had this moment of clarity.
- Set in stone idea of making pinball game.
- I can be more playful with the IDEA of pinball rather than recreating a familiar game
- Paine's work here is a familiar shape but pinball parts replaced by extrusion of a rock face
- The pinball machine is carved from wood between organic and man-made environments and the processing of machines.
- Influence: Ryan Gander / “Self Portrait X” / 2012
- Another example of the process I'm interested in by British artist Ryan Gander.
- Portraits from memory. But not the actual paintings, the paintings weredestroyed.
- What we see here are the pallets used to mix the paints
- Imagine the size from amount of paint and moods from the colours
- An idea of what painting could be if tradition is taken away
- Sketches
- Small scale test pieces when building a game.
- I almost discarded these but upon reviewing my work from the past few months these were most fun to build.
- Sketches 2
- Thinking differently about my approach - work as an artist rather than a designer (creating and end product)
- Perhaps these are framed parts, taken out of context of the machine
- Ball loops
- Visualising other experiment sketches - artists impressions if you will.
- The idea of a never ending loop of balls.
- Pin a china shop
- Based on places we are not allowed to play, why not? Lets break the rules
- The china must be smashed
- Zorbinball
- It may be that the idea goes no further than this stage, but if I can communicate it effectively and properly document it, who knows I may come back to it further down the line.


