

Don't let the title of this post mislead you, I actually love prototyping! This post is a documentation of my testing and exploration building pinball flippers.
Flippers.
What a funny word when you say it too much... prepare for overuse of said word in this post...
At first looking at the inside of a pinball machine is a bit of a mind f*ck. But after some explanation and research, breaking it down into the different elements - it's actually very simple.
Flippers
One of the most important parts of a pinball machine is the flippers. Generally speaking - flippers are 2 of the 3 possible ways you can control the ball - (the third being moving the machine ie nudging!) So it seems the best component to start with and I hope to get quickly up and running to play some pinball then add build in other components from there.
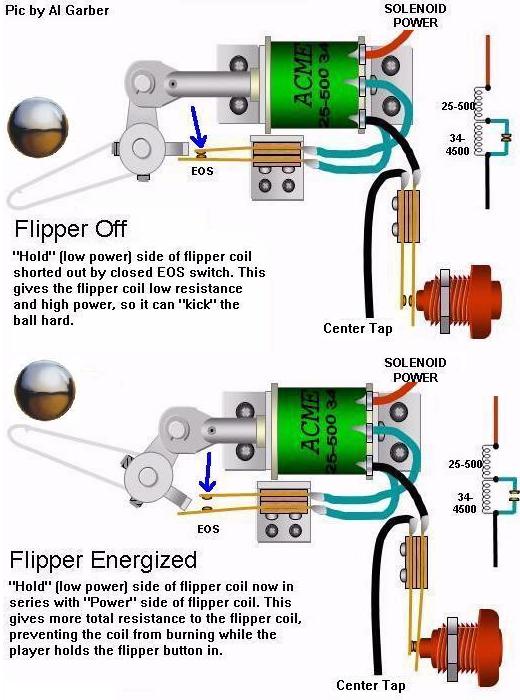 |
| Diagram: How Pinball Flippers Work |
When all the components and wires come together as one it appears quite complex (ok, it is!), but isolating each part (for example the flippers) I realised it's really only a button, solenoid, power and of course the plastic flipper and assembly.
Start Simple
I was almost tempted to dive straight into electronics, but figuring out all the correct components and power supplies to buy was a bit of a jump too far - if I accidentally bought the wrong part, or forgot about something, I would be wasting time and money, two things which aren't disposable just now.
So although I have started researching components, I have decided to focus on making my own mechanical parts using levers, linkages and good old elastic. This decision was inspired by some of the workshops I've been on in the tech lab this semester.
I'm going to document these prototypes in reverse order (so newest first).
Flippers #5 Improved Flipper System
See seperate post about the improved flipper system

Flippers #4 Pinbox
See separate post about the Pinbox concept
4.3 Wood / Lasercut
 |
| Lasercut MDF Pinbox Protoype |
4.2 Foamboard
 |
| Foam Board Pinbox Prototype |
4.1 Card
 |
| Card Pinbox Prototype |
The card and foam now look really rough around the edges but this was so important to quickly test out the concept and figure out how it works. With each one there is a bit of troubleshooting to do and that feeds into the next as improvements are made. For each one they work (to some extent) and its so exciting when making these to finally get them to the stage when they work and it's time to play!
Flippers #3 'Floating' Flippers
See separate post about Floating Flippers


Problems include the stability of the unit (needs to be clamped to something possibly), also the strength of the flippers and the time it took to put together due to how I designed and cut it. I'd like to either lasercut or cnc into thicker material so there is not so much glueing together of parts and I can use a full size pinball. So if I decide to continue this route there is more work to be done basically.
Flippers #2
See separate post about these
Flippers #1
See separate post about these
What's this all about?
This post is from my journal on MA Multi-Disciplinary Printmaking.
I am currently proposing a project based around arcade games, specifically Pinball (see list of posts about Pinball).
No comments:
Post a Comment